
Well top is a marker of zone that has been penetrated by well. In logview++, it will be plotted in log plot window and cross section window.
Create New Zone
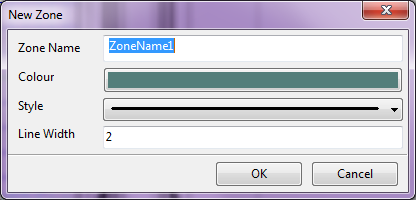
Well top can be created by accessing menu zonation and click new zone. A dialog will be prompted. Fill all properties; zone name, line width, line type, and line color, and then click ok to continue. A new zone will now exists in the main LogView++ project tree. In the panel of zone editor, you will see a table with new zone name and well name.
Delete Zones
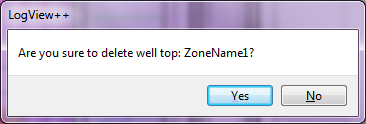
To delete a zone from project, Right Click Zone Name in the main project tree, and click Delete. Confirmation dialog will be shown up..
Edit Zones Properties
To edit the zone name, its line width, line style, and its color, right click zone name in the main project tree and click setting. An editing dialog will be prompted. Edit each property and click ok to update the property.
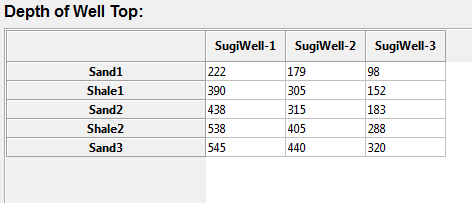
The most important property of well top is its depth position in every well. To edit it, go to panel zone editor and fill the depth in the table. In most cases, well top is recommended to be edited in TVD mode.. However, logview++ will save the MD data to make sure that a single depth especially for horizontal well that might have multiple TVD value for one value of MD. Consequently, if trajectory of the well is changed, the depth of TVD well top will be recalculated and overwritten.
!!!IMPORTANT!!!
Depth of -999.25 will be ignored. In case you really need that number, please give a bit change like -999.251.
Easier way to edit the depth of well top is by directly editing via log plot panel. By showing well top in log plot, at normal zoom mode, well top can be edited by dragging the well top (line) to a specific depth. By doing that, automatically the depth will be changed and the table of zone editor will also be refreshed.
It must be noted that LogView++ support only one depth data of each well for every well top. Therefore, in case of there is a fault penetrated by well that causes multiple depth of a well top in a single well, I recommend you to create a new different zone as a twin zone.
Import Zones
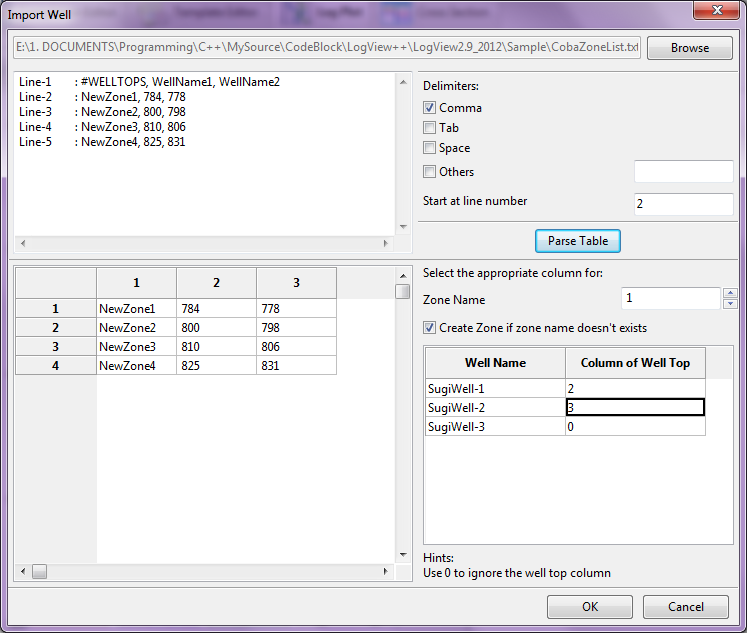
In case of you have a well top data, you can create a well top file in a text editor with format: WellTopName1, Depth@well1, Depth@well2, Depth@wellx, etc..
Example:
 #WELLTOPS, WellName1, WellName2

NewZone1, 784, 778

NewZone2, 800, 798

NewZone3, 810, 806

NewZone4, 825, 831
That formatted file can be directly imported to LogView++ thru menu Zonation and click import well top. A wizard dialog will be shown up. Browse the file, select the appropriate delimiter and the start line of the data and click Parse Table. After that, select the column of depth data for each existing well in the project. If the file doesn’t cover the depth data of a specific well, let it as default (0) which means to be ignored. You can also choose whether non-existing well top will be created or not. After click ok, a bunch of zone and its data should now be ready in the project.
Export Zones
Exporting well top is an easy way to create a delimited text file of the well top data. The format of generated file is similar to imported well top data file and described above.